
How to Supervise an iPhone or iPad with Apple Configurator
Apple Configurator is the traditional (but not recommended) way to put an iPhone or iPad into Supervised Mode without an MDM server. It requires owning a Mac computer and erasing the device.
- Platforms
- iOSiPadOS
 Gertrude Blocker
What is Supervised Mode?
Supervised Mode is a special mode initially created by Apple to give schools and businesses much more control over their iPhones and iPads. But it can also be enabled by anyone, making it a super useful tool for anyone who wants to more tightly control or restrict their iPhone or iPad.
Why use Apple Configurator
Although our supervision tool is much better for most users, there are still some reasons you might want to consider using Apple Configurator:
- If you don't want to pay $10 per year (83¢ per month) for the Light plan that lets Gertrude manage your supervision
- If you are comfortable with Apple Configurator already, and don't mind ongoing management of the device via repeated USB connections of the device to your Mac computer.
- If the device is brand new, or for any reason it is not a problem to hard reset it, erasing all of it's existing data (as is required with the existing model.)
Is there an Apple Configurator for Windows?
No. Apple publishes Apple Configurator for macOS only, so there is no way to supervise an iPhone or iPad with it from a Windows PC. If you don't own a Mac, use our supervision tool instead, which runs on Windows as well as macOS, and doesn't erase the device.
Video walkthrough
The video below walks through every screen, start to finish. If you'd rather read than watch, the same steps are written out underneath it.
Step-by-step instructions
These steps supervise the iPhone or iPad directly over USB, with no MDM server involved. You don't need to enroll the device in mobile device management, and there's nothing to sign up for beyond a free copy of Apple Configurator.
Before you start
- Install Apple Configurator from the Mac App Store. It's free, and it's the same app that used to be called Apple Configurator 2.
- Back up the device. This process erases it completely. Confirm there's a recent iCloud backup and that recent photos have finished uploading. Nearly everything should come back afterward, but it's worth double-checking you have a good backup before starting.
- Write down which apps are installed. They have to be put back by hand later, and screenshotting each home screen page is a good way to record them.
- Remove the device from Find My. Power the device all the way off, then sign in at icloud.com/find, find the device, and choose Remove This Device (you'll need the Apple Account password). Wait until it reads will be removed because supervision won't work until it does.
Supervising the device
- Connect the device. Turn it back on, plug it into the Mac with a USB cable, unlock it, and tap Trust at the "Trust This Computer?" prompt, entering the passcode. The device then should show up in Apple Configurator.
- Select the device and click Prepare, then work through the assistant: Manual Configuration with both checkboxes left ticked, Do not enroll in MDM, New organization (skip the sign-in step, then give it any name you like), Generate a new supervision identity, and finally Show all steps → Prepare.
- Confirm the erase when you're warned about it, then give it several minutes.
- Set the device up as it restarts: pick a language, set a passcode, and choose Don't Transfer Anything. Sign in with the Apple Account of whoever owns the device — you'll need a two-factor code from another device signed in to that account.
- Click Customize, not Continue, at the settings screen, and decline to bring over Screen Time settings. Restrictions carried over from an old Screen Time setup can interfere with supervision. Defer everything else: Apple Pay, Siri, and the rest can be set up later.
- Check that it worked. Open Settings; the top of the screen should read This iPhone is supervised and managed by... (or This iPad...). If it doesn't, select the device in Apple Configurator and run Prepare again.
Putting the apps back
- Sign in to Apple Configurator with the Apple Account belonging to the supervised device (Account → Sign In), not your own. This doesn't sign you out of anything else on your Mac, and you can sign back out when you're done.
- Select the device, then Add → Apps. You'll get a list of everything that account has ever downloaded, and you choose what goes back on. Larger apps take a few minutes, and an "already exists" error is safe to replace.
Creating a profile
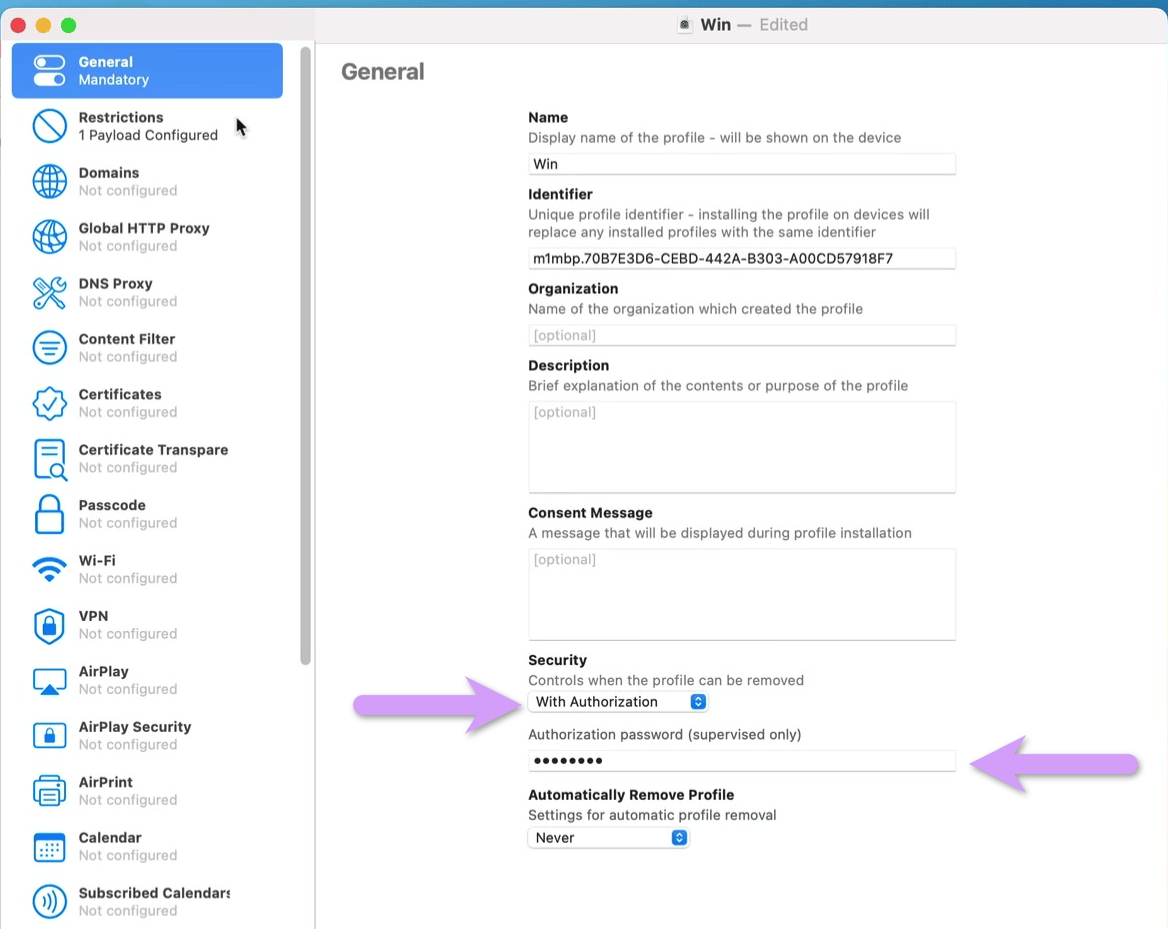
Supervision on its own doesn't restrict anything — the restrictions live in a configuration profile, a .mobileconfig file that bundles up your settings and gets installed onto the device. Create one from within Apple Configurator like so:
- File → New Profile, and give it a name.
- Set Security to With Authorization and add a password. If you skip this the person using the phone can delete the profile from the Settings app and remove restrictions.
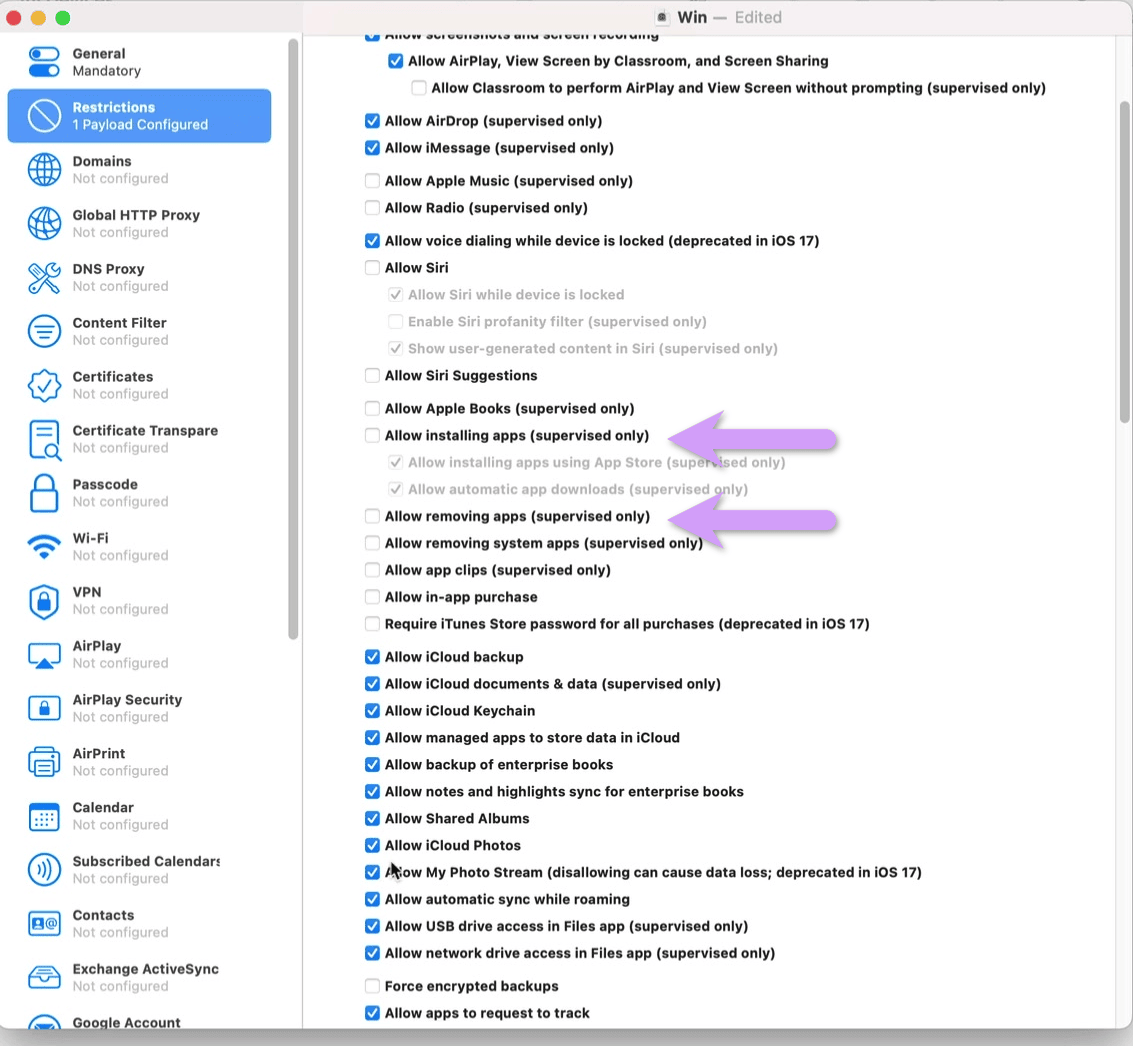
- Restrictions → Configure. There's a lot in here, but these matter most: turn off Allow removing apps so protective apps can't be deleted, turn off Allow erasing all content and settings, and turn on deferring software updates — new iOS releases regularly introduce fresh loopholes.
- On the Media Content tab, leave apps set to Allow all apps. Setting an age rating here causes strange problems, and the allowlist in the next step is a better control anyway.
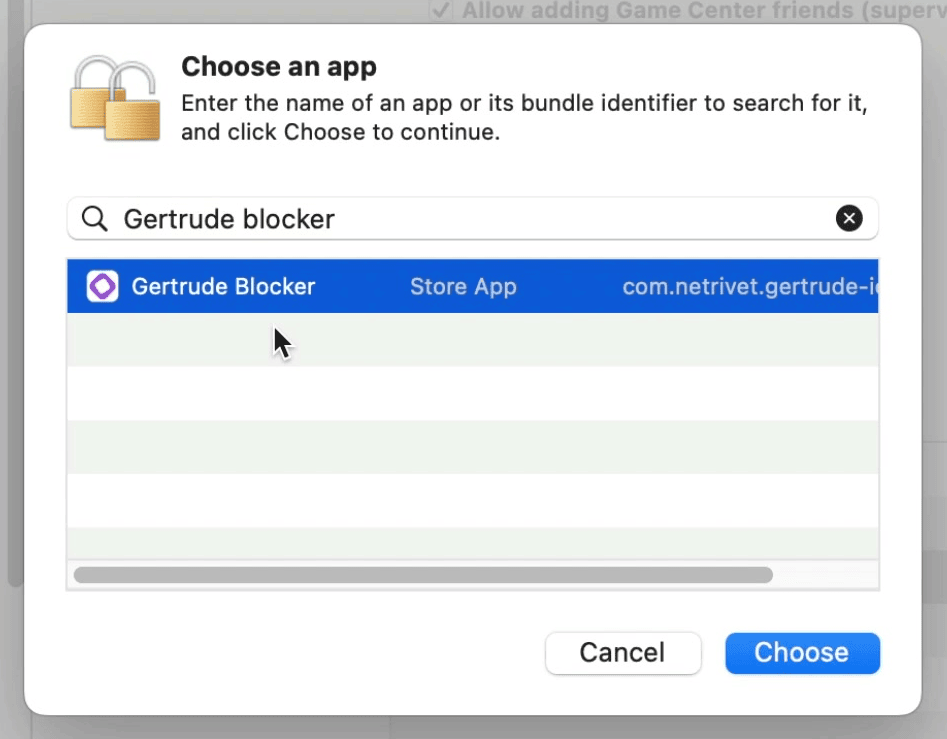
- On the Apps tab, set Restrict app usage to Only allow some apps, then list every app that's permitted. Apple's own apps count too — Clock, Weather, and Messages each have to be listed explicitly or they'll disappear.
- Save the profile with ⌘S, anywhere on your Mac, then right-click the device → Add → Profiles and pick it. Every app that isn't on your list won't be visible or launchable once you add the profile.
Adding the Gertrude content filter
This is the part that supervision unlocks and nothing else can. Apple won't let an adult install an internet content filter on their own iPhone or iPad, but it will on a supervised device. That's what lets Gertrude Blocker filter explicit content across the whole device, inside Apple's own apps — the #images GIF search in Messages is a good example — for someone over 18.
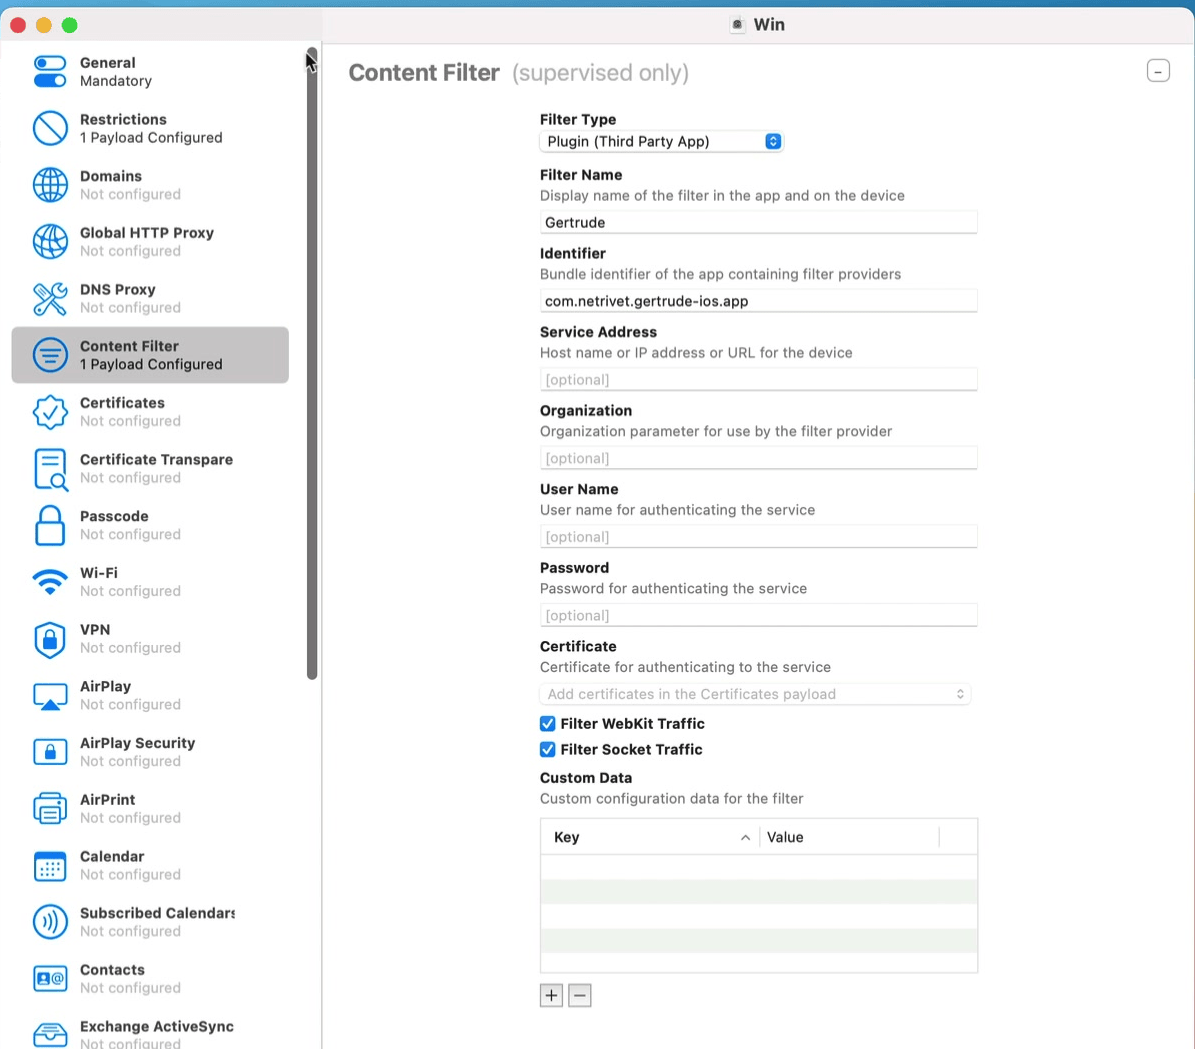
- Edit the profile → Content Filter → Configure, and set Filter Type to Plugin (Third Party App), Filter Name to Gertrude, and the identifier to
com.netrivet.gertrude-ios.app. - Save, then remove the profile from the device and add it right back. Profile edits don't sync on their own and there's no sync button, so removing and re-adding is how changes take effect. Ignore the scary warning when removing the profile, you add it right back a second later to sync.
- Launch Gertrude Blocker, which should now report that it's blocking.
A few things worth knowing
- To install an app later, add it to the profile's allowed list first and save, then remove and re-add the profile, then use Add → Apps. If the install is still refused, temporarily switch on Allow installing apps under Functionality, remove and re-add the profile, install, then switch it back off.
- Removing the profile temporarily can be useful. Plug the device in, take the profile off for a few minutes to install or update something, then add it back and you're exactly where you were.
- Supervision doesn't replace Screen Time. Both work at once, and most people who supervise a device use the two together. Make sure Screen Time settings are locked by a passcode, and work through our guide to locking down an iPhone if you haven't already.
Sample profile
As mentioned in the video, if you'd like a sample profile to help get you started, you can download the sample configuration profile and use it as your starting point.
Need help?
If you have any questions at all, we'd love to help. Drop us a line right here and we'll get right back to you!